
Introduction
Lasagna noodles are a beloved staple in Italian cuisine, adding texture and structure to a classic dish. While store-bought noodles are convenient, making your own fresh lasagna noodles can significantly enhance the flavor and overall quality of your homemade lasagna. In this guide, we’ll walk you through the process of creating lasagna noodles from scratch. This simple yet rewarding process will give you a deeper appreciation for this traditional Italian pasta and elevate your lasagna to a new culinary level.
Fresh lasagna noodles not only taste better but also offer a delightful texture that you can’t achieve with dried pasta. Moreover, homemade noodles allow you to experiment with different flavors and ingredients, making your dish unique. Whether you’re an experienced chef or a beginner in the kitchen, you’ll find this guide easy to follow and incredibly satisfying.
We’ll start with the basic ingredients and equipment you’ll need, followed by detailed instructions on how to prepare, roll, cut, and cook your lasagna noodles. Additionally, we’ll provide tips on drying and storing your noodles, as well as variations to suit different dietary preferences. Get ready to embark on a culinary adventure that will impress your family and friends with your homemade lasagna noodles.
What You’ll Need for Homemade Lasagna Noodles
To make lasagna noodles from scratch, you’ll need a few basic ingredients and some essential kitchen tools. Having the proper equipment ready will make the process easier and more enjoyable. Here’s a comprehensive list of what you’ll need to begin.
Ingredients
Basic Ingredients:
- All-purpose flour: 2 cups
- Eggs: 3 large
- Salt: 1 teaspoon
- Olive oil: 1 tablespoon
These ingredients form the foundation of your lasagna noodles. Flour provides the structure, while eggs and olive oil add richness and elasticity. Salt enhances the overall flavor.
Optional Ingredients:
- Spinach: For green pasta, adding a nutritional boost and a vibrant color.
- Tomato paste: For red pasta, offering a unique flavor and appealing hue.
Adding spinach or tomato paste can make your lasagna noodles not only visually appealing but also nutritionally diverse. These variations can elevate your dish and cater to different tastes and dietary needs.
Equipment
Essential Tools:
- Mixing bowl: A large bowl for combining your ingredients.
- Rolling pin or pasta machine: To roll out your dough into thin sheets.
- Knife or pasta cutter: For cutting the dough into lasagna noodles.
- Large pot: For boiling the noodles.
Having these tools will ensure that you can create smooth, even pasta sheets and easily cut them into uniform noodles. A pasta machine can simplify the rolling process, but a rolling pin works just as well with a bit more effort.
Preparing Your Workspace
Before you start, prepare your workspace. Clear a large, clean surface for kneading and rolling out the dough. Have all your ingredients and equipment ready and within reach. This organization will streamline the process and make it more enjoyable.
Creating lasagna noodles from scratch may seem daunting at first, but with the right preparation and tools, it becomes a fun and rewarding task. You’ll appreciate the difference fresh noodles make in your lasagna, and your efforts will be well worth it.
Ingredients
Making homemade lasagna noodles requires simple ingredients that you probably already have in your kitchen. Here’s a detailed list of the basic and optional ingredients you’ll need to make delicious, fresh lasagna noodles.
Basic Ingredients
- All-Purpose Flour (2 cups): Flour forms the backbone of your pasta dough. All-purpose flour works well, providing the right balance of strength and elasticity.
- Eggs (3 large): Eggs are crucial for binding the dough together and adding richness. They help create a smooth, pliable dough that rolls out easily.
- Salt (1 teaspoon): Salt enhances the flavor of your noodles. It’s essential for bringing out the taste of the flour and eggs.
- Olive Oil (1 tablespoon): Olive oil adds a touch of fat to the dough, making it more tender and easier to handle. It also adds a subtle flavor that complements the pasta.
Optional Ingredients
- Spinach: Adding pureed spinach to your dough creates vibrant green pasta. Spinach not only adds color but also boosts the nutritional value of your noodles.
- Tomato Paste: Incorporating tomato paste into your dough results in rich, red pasta. This adds a slight tomato flavor and a beautiful hue to your lasagna noodles.
These optional ingredients allow you to experiment with different flavors and colors, making your lasagna both visually appealing and delicious. You can adjust the quantities based on your preference and dietary needs.
Ingredient Preparation
Before you start mixing your dough, ensure all your ingredients are measured and ready. If you’re using spinach or tomato paste, prepare them in advance. For spinach, blanch it quickly in boiling water, then puree it in a blender. For tomato paste, simply measure out the desired amount.
By having everything ready, you streamline the dough-making process, ensuring a smooth workflow. This preparation helps avoid any interruptions once you start mixing and kneading your dough.
Dietary Adjustments
For those with dietary restrictions, you can Swap out the all-purpose flour for a gluten-free flour blend. Similarly, if you prefer whole grains, replace half of the all-purpose flour with whole wheat flour. These adjustments ensure that everyone can enjoy fresh, homemade lasagna noodles tailored to their dietary needs.
Step-by-Step Instructions for Fresh Lasagna Noodles
Making lasagna noodles from scratch involves several steps, each crucial to achieving perfect pasta. Follow these instructions carefully to prepare, roll, cut, and cook your lasagna noodles.
Preparing the Dough
Mixing the Dough
- Combine Dry Ingredients:
- In a large bowl, mix together 2 cups of all-purpose flour and 1 teaspoon of salt. Mix them well to distribute the salt evenly throughout the flour.
- Add Wet Ingredients:
- Make a well in the center of the flour mixture. Crack 3 large eggs into the well and add 1 tablespoon of olive oil. If you’re making colored pasta, this is the stage to add pureed spinach or tomato paste.
- Mix Together:
- Using a fork or your fingers, begin to mix the eggs and oil, gradually incorporating the flour from the sides of the well. Continue until the dough starts to come together.
Kneading the Dough
- Transfer to a Floured Surface:
- Once the dough begins to form, transfer it to a lightly floured surface. This step ensures you have enough space to knead effectively.
- Knead the Dough:
- Knead the dough for about 10 minutes. Use the heel of your hand to push the dough away from you, then fold it back over itself and rotate. Repeat this process until the dough is smooth, elastic, and slightly tacky but not sticky.
- Rest the Dough:
- Wrap the kneaded dough in plastic wrap to prevent it from drying out. Let it sit at room temperature for 30 minutes. Resting allows the gluten to relax, making the dough easier to roll out.
Rolling Out the Dough
Using a Rolling Pin
- Divide the Dough:
- Cut the rested dough into smaller, manageable portions. This makes rolling easier and ensures more uniform pasta sheets.
- Roll the Dough:
- On a floured surface, use a rolling pin to roll each portion into a thin sheet. Roll the dough to about 1/16 inch (1.5 mm) thickness. If the dough starts to stick, dust it lightly with flour.
Using a Pasta Machine
- Flatten and Feed the Dough:
- Flatten each portion of dough with your hands and feed it through the pasta machine on the widest setting. Fold the dough in half and repeat a few times to knead it further.
- Gradually Reduce Thickness:
- Gradually reduce the thickness setting on the pasta machine, feeding the dough through each time until you reach the desired thinness. Typically, setting 5 or 6 on a pasta machine yields the perfect thickness for lasagna noodles.
By following these steps, you’ll create smooth, even sheets of pasta ready to be cut into noodles. Whether using a rolling pin or a pasta machine, take your time to ensure the dough is rolled out evenly.
Rolling and Cutting Lasagna Noodles
After rolling out your dough, the next step is to cut it into lasagna noodles. This process can be done by hand or with a pasta cutter, depending on your preference and available tools.
Cutting by Hand
- Measure and Cut:
- Lay the rolled-out dough sheets flat on a clean, floured surface. Use a ruler to measure and mark the desired width of your lasagna noodles. Typically, lasagna noodles are about 2 to 3 inches wide.
- Slice the Noodles:
- Using a sharp knife, slice the dough along the marks you made. Try to keep the cuts straight and even to ensure uniform noodles. You can stack the sheets and cut multiple noodles at once to save time, but be sure to flour the dough lightly to prevent sticking.
- Trim to Length:
- If your dough sheets are very long, you might need to trim the noodles to a manageable length, typically around 10 to 12 inches. This size fits well into most baking dishes and makes layering easier.
Using a Pasta Cutter
- Set Up the Cutter:
- Attach the lasagna noodle cutter to your pasta machine, or use a handheld pasta cutter. Ensure it’s clean and properly assembled.
- Feed the Dough:
- Feed the rolled-out dough sheets through the pasta cutter. The machine will cut the dough into uniform strips, saving time and effort.
- Adjust as Needed:
- If the noodles come out longer than desired, use a knife to trim them to the appropriate length.
Storing the Cut Noodles
- Prevent Sticking:
- As you cut the noodles, lay them flat or hang them over a pasta drying rack. Lightly dust them with flour to prevent sticking.
- Prepare for Cooking:
- If you’re cooking the noodles immediately, you can proceed to the next step. Otherwise, let the noodles dry for at least 30 minutes if you’re planning to store them. For long-term storage, dry them completely.
- Storage Options:
- Store dried noodles in an airtight container at room temperature for up to one week. Alternatively, you can freeze the cut noodles in a single layer on a baking sheet, then transfer them to a freezer-safe bag once frozen. Frozen noodles can be stored for up to three months.
By following these steps, you’ll have perfectly cut lasagna noodles ready for cooking. Whether you cut them by hand or use a pasta cutter, ensuring uniformity will make your lasagna look professional and cook evenly.
Cooking Lasagna Noodles
Cooking your freshly made lasagna noodles is a crucial step that ensures they have the perfect texture for your lasagna. Follow these instructions to cook your noodles to perfection.
Boiling the Noodles
Preparing the Water
- Fill a Large Pot:
- Fill a large pot with water, leaving enough space for the noodles to move freely. This helps prevent them from sticking together.
- Add Salt:
- Generously salt the water. Typically, use about 1 tablespoon of salt per gallon of water. The salty water enhances the flavor of the noodles as they cook.
- Bring to a Boil:
- Heat the water until it reaches a rolling boil over high heat. Boiling water ensures the noodles cook evenly and quickly.
Cooking the Noodles
- Add the Noodles:
- Gently add the lasagna noodles to the boiling water. To avoid sticking, stir them gently with a wooden spoon or a pasta fork.
- Cook Until Al Dente:
- Fresh lasagna noodles cook much faster than dried ones. Boil the noodles for 2-3 minutes until they are al dente, meaning they should be tender but still firm to the bite. Overcooked noodles can become mushy and fall apart.
- Test for Doneness:
- Check if a noodle is done by taking a bite. It should be cooked through but with a slight firmness in the center. If it’s too firm, cook for an additional 30 seconds and test again.
Draining the Noodles
- Drain the Noodles:
- Once cooked, drain the noodles in a colander. Be careful not to overfill the colander to avoid breaking the noodles.
- Rinse with Cold Water:
- Rinse the noodles with cold water to stop the cooking process. This also removes excess starch and prevents sticking.
- Dry the Noodles:
- Lay the noodles flat on a clean kitchen towel or parchment paper to dry slightly. This step ensures they are not too wet when assembling your lasagna, which can make the dish watery.
Preparing for Assembly
- Lay Flat:
- Lay the cooked noodles flat to avoid tangling and sticking. If you’re not using them immediately, lightly oil the noodles to prevent them from drying out and sticking together.
- Storage:
- If you need to store the noodles for a short period before assembly, keep them covered with a damp cloth. For longer storage, store them in an airtight container in the refrigerator for up to 24 hours.
Tips for Perfect Noodles
- Use Plenty of Water:
- Using a large pot with plenty of water ensures the noodles have enough space to cook evenly and reduces the chances of them sticking together.
- Stir Gently:
- Stirring the noodles gently during the first few minutes of cooking helps to separate them and prevent sticking.
- Avoid Overcooking:
- Fresh noodles cook quickly. Keep a close eye on them and test frequently to avoid overcooking.
By following these steps, you’ll ensure your lasagna noodles are perfectly cooked, enhancing the texture and flavor of your lasagna. Properly cooked noodles are essential for creating layers that hold together and provide a delightful eating experience.
Drying and Storing the Noodles
Properly drying and storing your homemade lasagna noodles ensures they maintain their quality and are ready to use whenever you need them. Follow these steps to dry and store your noodles effectively.
Drying the Noodles
Immediate Use
- Lay Noodles Flat:
- If you plan to use the noodles immediately, lay them flat on a clean kitchen towel or parchment paper after cooking. This step helps them dry slightly and prevents them from sticking together during assembly.
For Short-Term Storage
- Dry for 30 Minutes:
- If you need to store the noodles for a few hours or up to a day, let them dry for at least 30 minutes after cooking. Lay them in a single layer on a clean kitchen towel or drying rack.
- Store in an Airtight Container:
- After drying, place the noodles in an airtight container. Store them in the refrigerator if you plan to use them within 24 hours. This keeps them moist and fresh.
For Long-Term Storage
- Completely Dry the Noodles:
- If you want to store the noodles for a longer period, dry them completely. Lay them flat or hang them on a pasta drying rack. Let them air dry for 12-24 hours, depending on the humidity and thickness of the noodles. They should be brittle and snap easily when fully dry.
- Store in an Airtight Container:
- Once fully dried, store the noodles in an airtight container or a resealable plastic bag. Keep them at room temperature in a cool, dry place. Properly dried and stored noodles can last up to one week.
- Freeze for Extended Storage:
- For longer storage, consider freezing the noodles. Lay the dried noodles on a baking sheet in a single layer and freeze until solid. Once frozen, move them to a freezer-safe bag or container. Frozen noodles can be stored for up to three months. When ready to use, thaw them at room temperature or directly add them to boiling water.
Storage Tips
- Prevent Sticking:
- To prevent noodles from sticking together during storage, ensure they are completely dry before storing. For cooked noodles, lightly oil them before placing them in an airtight container.
- Label and Date:
- Label your storage bags or containers with the preparation date. This helps you keep track of their freshness and use them within the recommended time frame.
- Avoid Moisture:
- Store dried noodles in a cool, dry place. Avoid humid areas as moisture can cause the noodles to spoil or become moldy.
Using Stored Noodles
- Rehydrating Dried Noodles:
- If you’ve dried your noodles, they’ll need to be rehydrated before use. Simply boil them in salted water for 2-3 minutes until they are tender but firm.
- Using Frozen Noodles:
- Frozen noodles can be added directly to boiling water without thawing. Cook them until they reach the desired texture, typically 3-4 minutes.
By following these steps, you can ensure your homemade lasagna noodles are always ready to use, maintaining their quality and flavor. Proper drying and storage extend the shelf life of your noodles and make your cooking process more efficient.
Nutrition Score
Homemade lasagna noodles are a healthier alternative to store-bought versions, as they are made with simple, wholesome ingredients and free from preservatives and additives. Here’s a closer look at the nutritional benefits of homemade lasagna noodles and how they can fit into a balanced diet.
Nutritional Benefits of Homemade Lasagna Noodles
- High-Quality Ingredients:
- Homemade lasagna noodles are made from high-quality, natural ingredients like all-purpose flour, eggs, and olive oil. These ingredients provide essential nutrients and contribute to a healthier diet.
- Rich in Protein:
- The eggs used in the dough are an excellent source of protein. Protein is essential for building and repairing tissues, making enzymes, and supporting overall health.
- Healthy Fats:
- Olive oil adds healthy monounsaturated fats to the noodles. These fats are known to improve heart health by reducing bad cholesterol levels and increasing good cholesterol levels.
- Essential Vitamins and Minerals:
- Eggs are rich in vitamins and minerals such as vitamin A, vitamin D, and B vitamins, which support various bodily functions. Olive oil also contains vitamin E, an antioxidant that helps protect cells from damage.
Caloric and Macronutrient Content
- Calories:
- One serving of homemade lasagna noodles (about 100 grams) typically contains around 200-250 calories. The exact number can vary depending on the thickness of the noodles and the specific ingredients used.
- Carbohydrates:
- Flour is the primary source of carbohydrates in lasagna noodles. Carbohydrates provide the body with energy and are essential for proper brain function.
- Protein:
- Each serving of noodles contains approximately 6-8 grams of protein, mainly from the eggs. Protein is crucial for muscle development and repair.
- Fats:
- The olive oil in the dough contributes to the fat content, providing around 5-7 grams of fat per serving. Most of these fats are healthy monounsaturated fats.
Dietary Adjustments and Variations
- Whole Wheat Noodles:
- For added fiber and nutrients, you can replace half of the all-purpose flour with whole wheat flour. Whole wheat flour increases the fiber content, aiding digestion and providing a feeling of fullness.
- Gluten-Free Noodles:
- Substitute all-purpose flour with a gluten-free flour blend to make the noodles suitable for those with gluten intolerance or celiac disease. Ensure the blend contains a mix of rice flour, tapioca starch, and xanthan gum for the best results.
- Vegetable-Infused Noodles:
- Adding pureed spinach or tomato paste to the dough increases the nutritional value by incorporating additional vitamins and minerals. Spinach adds iron and vitamin K, while tomato paste provides lycopene, an antioxidant beneficial for heart health.
Serving Size and Portions
- Portion Control:
- Keep portion sizes in mind when serving lasagna noodles. A standard serving size is about 1 cup of cooked noodles, which is roughly equivalent to 100 grams of uncooked noodles.
- Balanced Meals:
- Pair your lasagna noodles with a balanced mix of protein, vegetables, and healthy fats. This ensures a well-rounded meal that provides all essential nutrients.
By making your own lasagna noodles, you have complete control over the ingredients, allowing you to create a healthier and more nutritious meal. Incorporating these noodles into a balanced diet can contribute to overall well-being and support a healthy lifestyle.
Serving & Storage
Properly serving and storing your homemade lasagna noodles ensures they maintain their texture and flavor. Follow these tips for the best results when incorporating your fresh noodles into your lasagna dishes and storing any leftovers.
Serving Tips
- Immediate Use:
- If you’re using the noodles immediately, you can layer them directly into your lasagna. Ensure they are slightly dried but still pliable to handle easily.
- Layering Noodles:
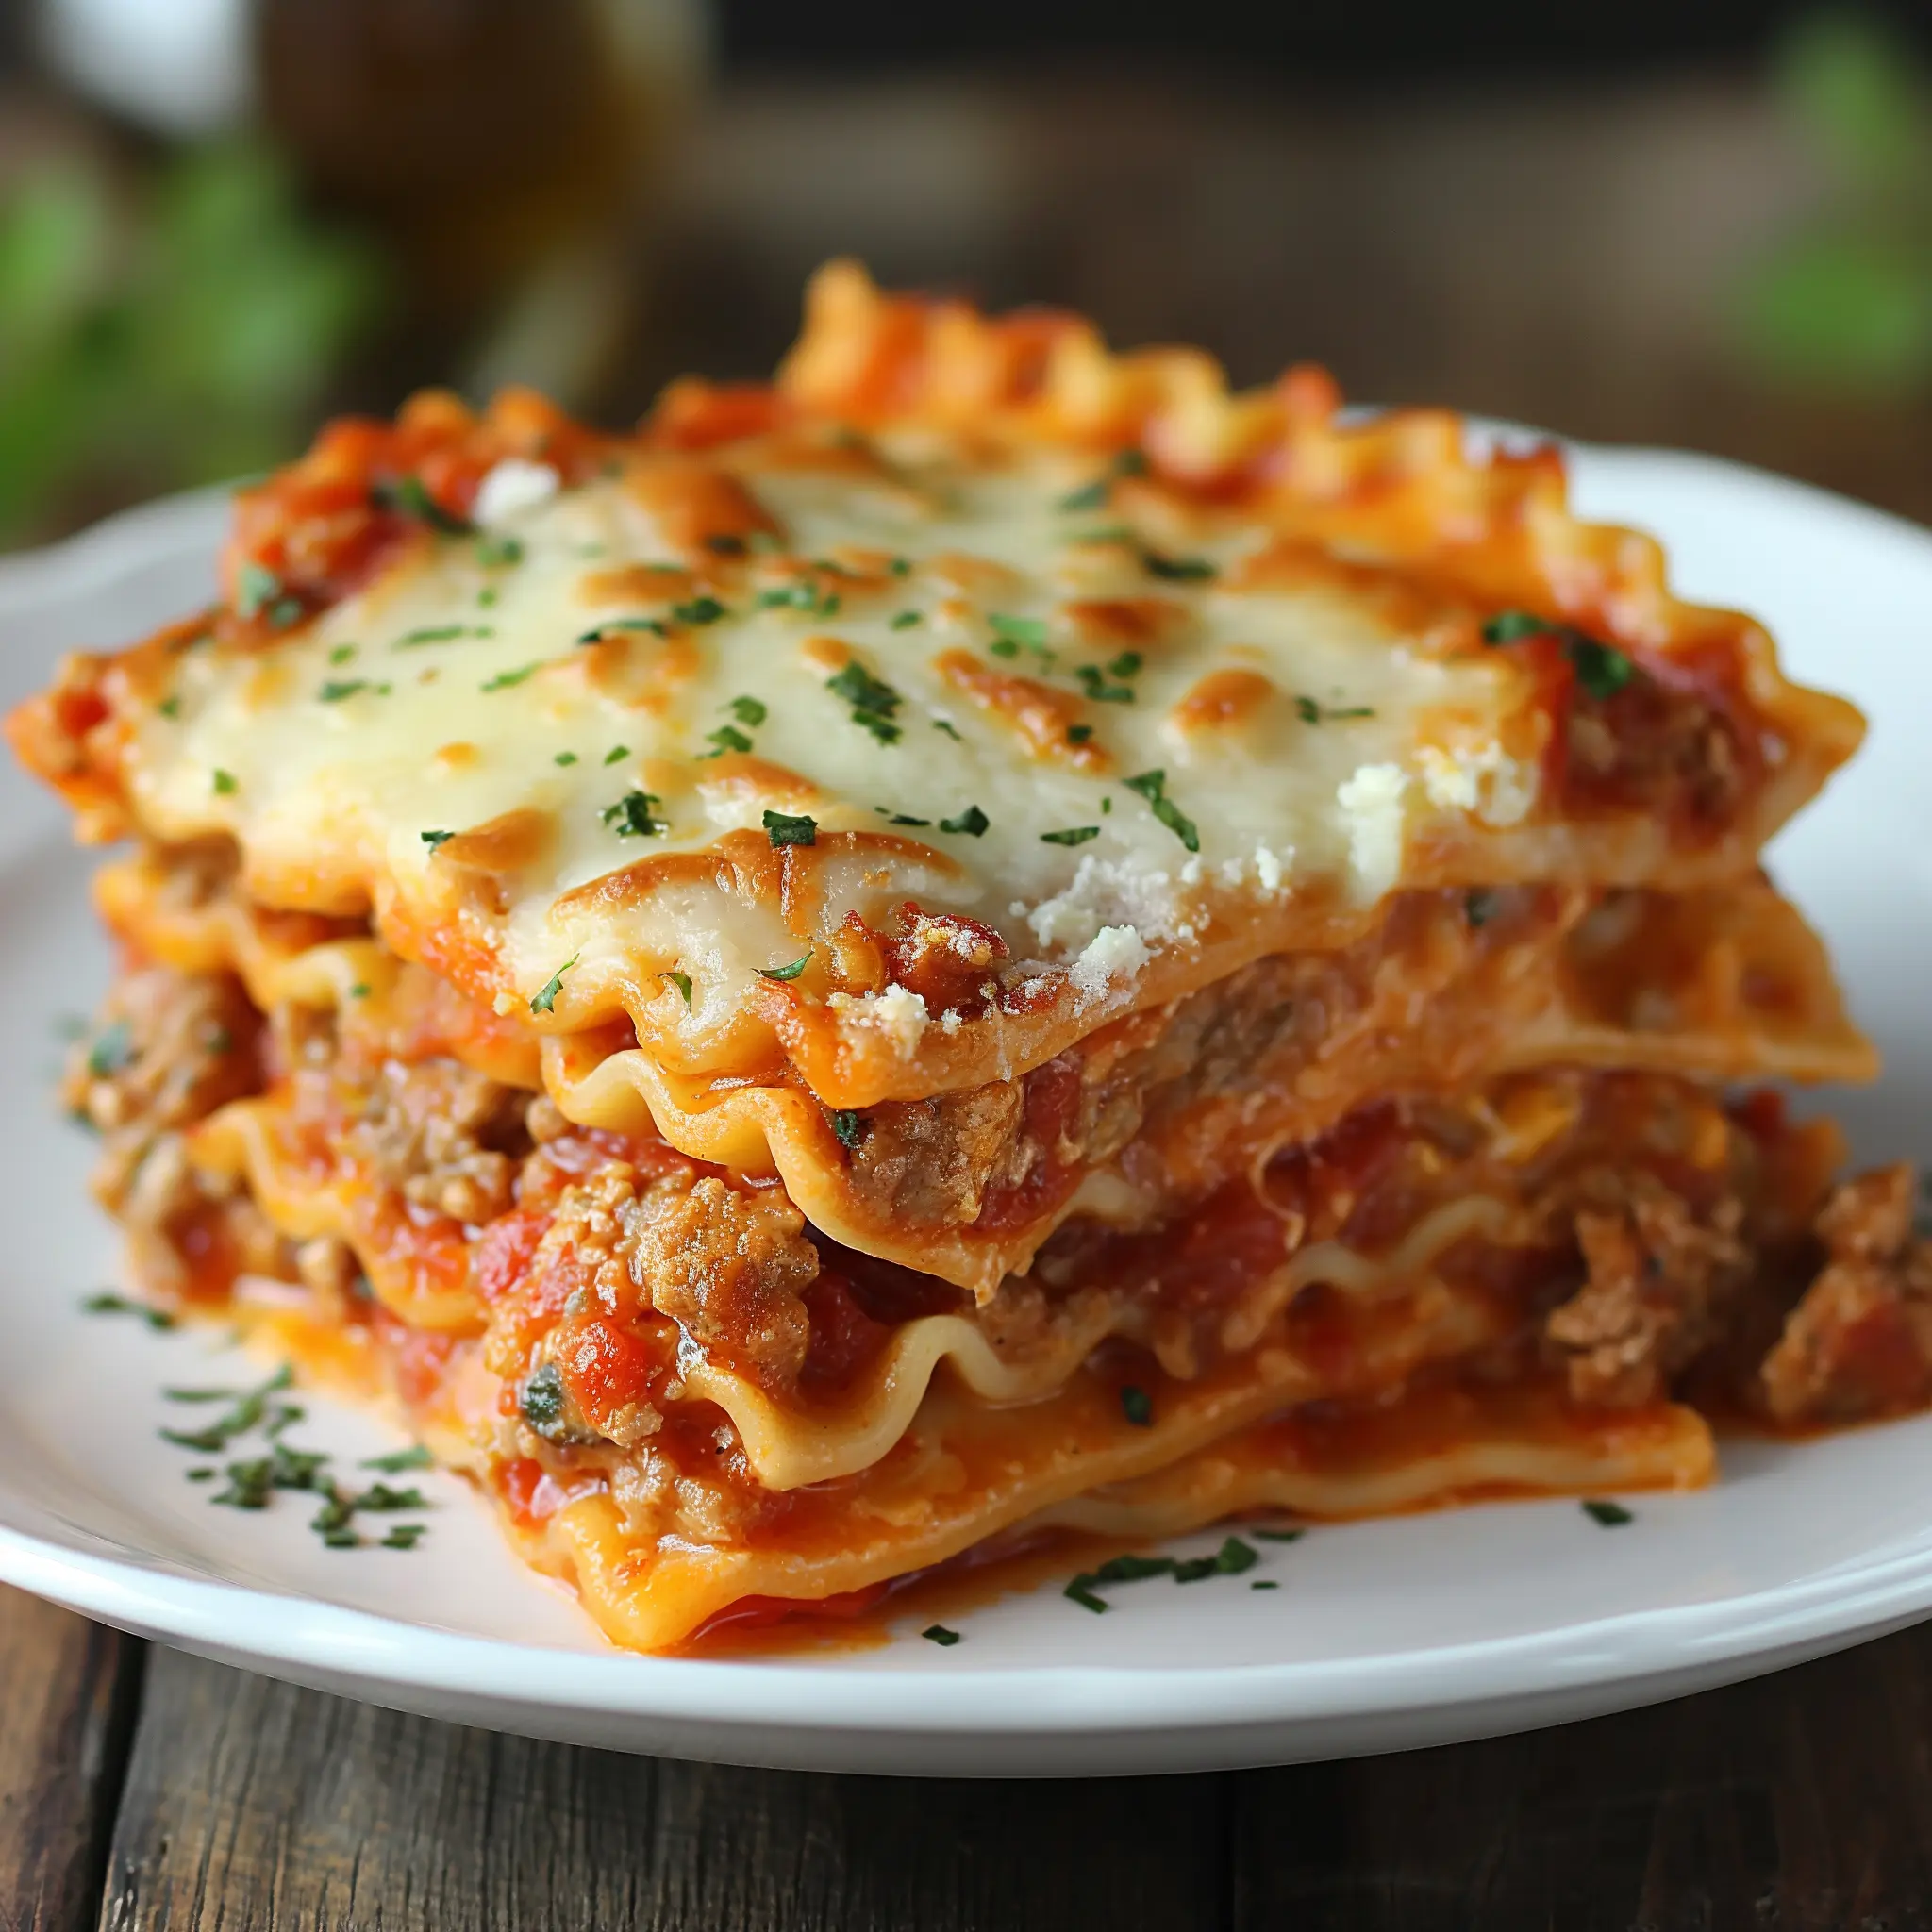
- When assembling your lasagna, start with a layer of sauce at the bottom of your baking dish. Add a layer of noodles, followed by your choice of filling such as ricotta cheese, ground meat, or vegetables. Repeat the layers, ending with a final layer of sauce and cheese on top.
- Cooking Time:
- Fresh lasagna noodles need less baking time than dried noodles.Typically, bake your lasagna at 375°F (190°C) for about 25-30 minutes, or until the top is bubbly and golden brown. Cover the dish with aluminum foil for the first half of the baking time to prevent the cheese from burning.
- Resting Before Serving:
- After baking, let the lasagna rest for 10-15 minutes before cutting and serving. This allows the layers to set and makes it easier to cut neat slices.
Storage Tips
Short-Term Storage
- Refrigeration:
- Store leftover cooked noodles in an airtight container in the refrigerator. They will keep for up to 3 days. Make sure the noodles are completely cool before sealing the container to prevent condensation and moisture buildup.
- Layer Separation:
- To prevent the noodles from sticking together, place a piece of parchment paper or plastic wrap between each layer before refrigerating.
Long-Term Storage
- Freezing Uncooked Noodles:
- For longer storage, freeze uncooked noodles. Lay the noodles flat on a baking sheet in a single layer and place them in the freezer until they are solid. Place the frozen noodles into a freezer-safe bag or container. Label the bag with the date and type of noodles. Frozen noodles can be stored for up to three months.
- Freezing Cooked Noodles:
- If you have leftover cooked noodles, you can freeze them too. Place the cooled noodles in a single layer on a baking sheet, freeze until solid, and then transfer them to a freezer-safe container. When ready to use, thaw in the refrigerator overnight or add directly to boiling water.
- Thawing and Reheating:
- Thaw frozen noodles in the refrigerator overnight for best results. To reheat, either boil them for a couple of minutes or add them directly to your lasagna during assembly. If reheating an already baked lasagna, cover it with foil and bake at 350°F (175°C) until heated through, about 20-30 minutes.
Best Practices for Storage
- Avoid Moisture:
- Ensure noodles are thoroughly dry before storing them to prevent mold growth. Moisture is the enemy of dried pasta.
- Use Airtight Containers:
- Always use airtight containers or resealable bags to store noodles. This keeps them fresh and prevents exposure to air and contaminants.
- Labeling:
- Label all stored noodles with the preparation date and contents. This helps keep track of their freshness and ensures you use the oldest noodles first.
By following these serving and storage tips, you can enjoy your homemade lasagna noodles at their best, whether freshly made or stored for later use. Proper handling extends the shelf life of your noodles and maintains their quality, ensuring delicious lasagna dishes every time.
Variations of Fresh Lasagna Noodles

Homemade lasagna noodles are versatile and can be customized to fit various dietary preferences and tastes. Here are some popular variations to try, each adding a unique twist to your lasagna dishes.
Gluten-Free Lasagna Noodles
- Ingredients:
- Substitute the all-purpose flour with a gluten-free flour blend. Ensure the blend includes a mix of rice flour, tapioca starch, and xanthan gum for elasticity.
- Instructions:
- Follow the same steps for mixing, kneading, and rolling the dough as you would with regular flour. Gluten-free dough may require a bit more kneading to achieve the right consistency.
- Cooking Tips:
- Gluten-free noodles may cook faster than regular noodles, so keep a close eye on them to prevent overcooking. Boil them for 1-2 minutes and test for doneness.
Vegetable-Infused Noodles
- Spinach Noodles:
- Ingredients: Add 1 cup of pureed spinach to your dough mixture.
- Instructions: Blanch the spinach in boiling water for a few seconds, then transfer it to ice water. Squeeze out excess water and puree it in a blender. Incorporate the spinach puree into your dough along with the eggs and olive oil.
- Tomato Noodles:
- Ingredients: Add 2 tablespoons of tomato paste to your dough mixture.
- Instructions: Mix the tomato paste with the eggs and olive oil before incorporating it into the flour. This adds a rich flavor and a beautiful red hue to your noodles.
- Cooking Tips:
- Both spinach and tomato noodles follow the same cooking process as regular noodles. Boil them for 2-3 minutes until al dente.
Whole Wheat Noodles
- Ingredients:
- Replace half of the all-purpose flour with whole wheat flour. This adds a nuttier flavor and increases the fiber content of your noodles.
- Instructions:
- Mix, knead, and roll the dough as usual. Whole wheat dough may be slightly denser, so ensure you knead it thoroughly to develop the gluten.
- Cooking Tips:
- Whole wheat noodles may take a bit longer to cook. Boil them for 3-4 minutes until they reach the desired tenderness.
Herb-Infused Noodles
- Ingredients:
- Add finely chopped fresh herbs such as basil, parsley, or rosemary to the dough mixture. About 2 tablespoons of herbs should suffice.
- Instructions:
- Mix the herbs with the flour and salt before adding the wet ingredients. This distributes the herbs evenly throughout the dough.
- Cooking Tips:
- Herb-infused noodles cook similarly to regular noodles. Boil for 2-3 minutes, and enjoy the added flavor and aroma.
Nutritional Adjustments
- Low-Carb Noodles:
- Use almond flour or a low-carb flour blend instead of all-purpose flour. You may need to adjust the number of eggs to achieve the right consistency.
- High-Protein Noodles:
- Add protein powder to your flour mixture. Use unflavored or savory-flavored protein powder to avoid altering the taste of your noodles.
- Vegan Noodles:
- Use flaxseed meal or chia seeds mixed with water as an egg substitute. Combine 1 tablespoon of flaxseed meal or chia seeds with 3 tablespoons of water per egg.
Tips for Success
- Experimenting:
- Feel free to experiment with various ingredients and proportions. Each variation may require slight adjustments in the amount of liquid or flour.
- Consistency:
- The dough should be smooth and elastic regardless of the ingredients. Adjust the amount of flour or liquid as needed to achieve this texture.
- Flavor Balance:
- Ensure the added ingredients do not overpower the noodles. Aim for a balance that enhances the overall flavor of your lasagna.
By exploring these variations, you can create lasagna noodles that cater to your specific dietary needs and preferences. Each type offers a unique taste and texture, allowing you to customize your lasagna and impress your family and friends with your culinary creativity.
FAQs about Making Lasagna Noodles
Here are some frequently asked questions about making lasagna noodles from scratch, along with detailed answers to help you master the process.
How do I store homemade lasagna noodles?
Short-Term Storage:
- Store cooked noodles in an airtight container in the refrigerator for up to 3 days. Layer them with parchment paper to prevent sticking.
- For uncooked noodles, let them dry for at least 30 minutes and store them in an airtight container in the refrigerator for up to 24 hours.
Long-Term Storage:
- For longer storage, dry the noodles completely and store them in an airtight container at room temperature for up to one week.
- Alternatively, freeze the noodles by laying them flat on a baking sheet until solid, then transfer them to a freezer-safe bag. Frozen noodles can last up to three months.
Can I use gluten-free flour for lasagna noodles?
Yes, you can use a gluten-free flour blend instead of all-purpose flour. Here’s how:
Ingredients:
- Use a blend of rice flour, tapioca starch, and xanthan gum to mimic the properties of regular flour.
Instructions:
- Follow the same steps for mixing, kneading, and rolling the dough. You may need to adjust the amount of liquid to achieve the right consistency, as gluten-free flour blends can vary.
Cooking Tips:
- Gluten-free noodles often cook faster than regular noodles, so monitor them closely to avoid overcooking. Boil for 1-2 minutes and test for doneness.
How long should homemade lasagna noodles dry?
Immediate Use:
- If you’re using the noodles right away, let them dry for about 30 minutes to become slightly firmer and easier to handle.
Short-Term Storage:
- For storing noodles for a few hours to a day, let them dry for at least 30 minutes before placing them in an airtight container.
Long-Term Storage:
- To store the noodles for longer periods, dry them completely by air-drying for 12-24 hours. They should be brittle and snap easily when fully dry. Store them in an airtight container at room temperature or freeze them for extended storage.
What’s the best way to cook lasagna noodles without breaking them?
- Use Plenty of Water:
- Fill a large pot with ample water to give the noodles enough space to move freely. This reduces the chances of sticking and breaking.
- Add Salt:
- Salt the water generously to enhance the flavor and help prevent sticking.
- Boil Gently:
- Ensure the water is at a rolling boil before adding the noodles. Gently lower the noodles into the water and stir occasionally to prevent sticking.
- Monitor Closely:
- Fresh noodles cook quickly, usually within 2-3 minutes. Monitor them closely and test often to avoid overcooking.
- Drain Carefully:
- Use a colander to drain the noodles gently. Avoid overfilling the colander to prevent the noodles from breaking under their own weight.
How can I stop my lasagna noodles from sticking together?
- Use Flour:
- When rolling and cutting the noodles, dust them lightly with flour to prevent sticking.
- Layer Separators:
- If storing the noodles, place parchment paper or plastic wrap between each layer to keep them separate.
- Oil Lightly:
- After cooking, toss the noodles lightly with olive oil to prevent them from sticking together.
- Cook in Batches:
- If making a large batch, cook the noodles in smaller quantities to ensure they have enough space in the pot.
Can I make lasagna noodles without a pasta machine?
Yes, you can make lasagna noodles without a pasta machine. Here’s how:
- Divide the Dough:
- After kneading, divide the dough into smaller portions to make rolling easier.
- Roll by Hand:
- Using a rolling pin, roll each portion on a floured surface to your desired thickness, typically around 1/16 inch (1.5 mm).
- Cut by Hand:
- Use a sharp knife or a pizza cutter to slice the dough into lasagna noodles of the desired width and length.
By following these tips and answers to common questions, you’ll be well-equipped to make perfect homemade lasagna noodles. Understanding the nuances of storage, cooking, and handling will ensure your noodles are always at their best.
Conclusion
Making lasagna noodles from scratch is a rewarding culinary endeavor that can significantly enhance the flavor and texture of your homemade lasagna. Whether you’re a seasoned cook or a novice in the kitchen, following this guide will help you create delicious, fresh noodles that will impress your family and friends.
By using simple, high-quality ingredients like all-purpose flour, eggs, and olive oil, you can ensure that your noodles are both nutritious and delicious. Additionally, the flexibility to incorporate variations such as gluten-free, whole wheat, or vegetable-infused noodles allows you to customize your lasagna to suit various dietary preferences and tastes.
Key Takeaways
- Ingredient Preparation:
- Always start with fresh, high-quality ingredients for the best results. Simple ingredients like flour, eggs, and olive oil form the basis of your lasagna noodles.
- Mixing and Kneading:
- Proper mixing and kneading are crucial to developing a smooth and elastic dough. Allow the dough to rest, which makes it easier to roll out and handle.
- Rolling and Cutting:
- Use a rolling pin or pasta machine to achieve thin, even sheets of dough. Cut the noodles to your desired width and length, ensuring they are uniform for even cooking.
- Cooking the Noodles:
- Cook the noodles in plenty of salted water until al dente. Drain and rinse with cold water to stop the cooking process and prevent sticking.
- Drying and Storing:
- Properly dry the noodles for short-term or long-term storage. Store them in an airtight container or freeze them for future use.
- Serving Suggestions:
- Use the noodles immediately in your favorite lasagna recipe or store them for later use. Layer them with sauce, cheese, and your preferred fillings for a delicious, homemade lasagna.
Final Tips
- Experiment with Variations:
- Don’t hesitate to try different variations such as gluten-free, whole wheat, or herb-infused noodles. Each variation adds a unique twist to your dish.
- Attention to Detail:
- Pay close attention to each step, from mixing the dough to cooking the noodles. Small details can significantly impact the final result.
- Practice Makes Perfect:
- Making pasta from scratch can be a bit challenging at first, but with practice, it becomes easier and more enjoyable. The satisfaction of creating your own lasagna noodles is well worth the effort.
By following this comprehensive guide, you’ll master the art of making homemade lasagna noodles, elevating your lasagna dishes to a whole new level. Enjoy the process and the delicious results!